Thursday, September 26, 2013

You are a Bit Faker Rosie Lee


I confess: My nail polish drought was short lived :). To break my fast, I went all glitter.  We are talking dense, colorful, gorgeous glitter!  As they say, go big or go home!


If one beautiful glitter is good, two is better!  I started with a full manicure of Butter London's Bit Faker. 

This is a great full coverage copper glitter. It is so good, this is two coats. No matter how you turn your fingers, it sparkles!  I couldn't stop there.  Hubby to Be and I still had half an episode of Broadchurch (love!) to finish. I can't sit still during cliff hangers. Besides, Doctor Who just figured out who the killer was and I was fretting a bit...but I digress...

I decided to sponge on some Rosie Lee on my tips. She is just as full coverage as her copper friend. Sponged on and blended easily. 


Wednesday, September 25, 2013

Little and lots of inspiration.


So I haven't been posting much lately as I have not been inspired for my nails much lately. There is a lot out there, but when I have sat down to get to work, it just hasn't come. So I decided to let my nails breathe for a few days instead. And maybe, just maybe some of my shorter nails will buck up and grow a bit. 
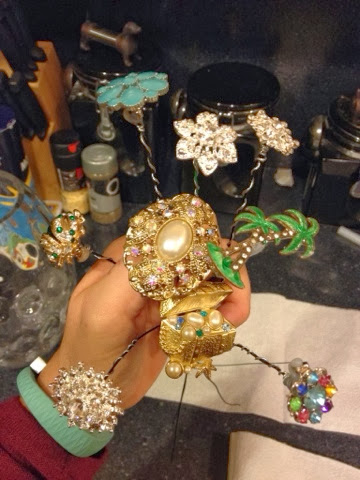
In the mean time, I have been planning my wedding a bit more. It is now less than 6 months away!  One of the things I have been working on is a brooch bouquet. I have some collected and water to start making the "flowers" out of them to see where I am at am what I have. It's a pretty easy process, but time intensive for each one. 

I have about a third of my collected brooches now stemming some basic stems at the moment. Once I finish this step in the process with the remainder, I will be wrapping the wire with floral tape and then making bunches out of the individual flowers. Stay tuned for more progress pictures for this project!

Wednesday, September 18, 2013

Pretty In Pink


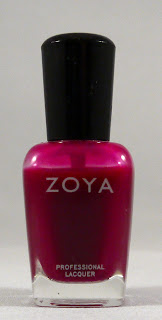
I think one of the manicures that originally attracted me to the world that is nail art is the jelly sandwich using glitter.  Sadly, this never really worked out for me.  I had this polish, but the effect was never right.  I had this jelly polish from Zoya, but it never seemed to work out.  Then, I saw this with dots and others with flowers, I wish I could remember where.  Either in Pinterest or blogs.  I thought, "I bet this will work out better.  I just know it."  sure enough, I think the first attempt at the effect came out pretty well.  I like the floating below the surface look of the dots.  I would have liked to try it with larger dots, but with two nails that keep breaking [angry face], I thought the larger dots would be too overwhelming on the shorted nails.  If anyone has any suggestions as to how to get these two little nails grow up big and strong likes their neighbors, I would love to hear it.  

Color used:  
Zoya Paloma
Step 1.
    - Paint a light coat with your base color.  

Step 2.
   - Using white polish or paint, place a few dots on each nail.

Step 3....and 4.

    - Layer another thin layer of your color.  Then place more dots.

Repeat.  Continue your color layers until you have the depth of dots and depth of color that you want. Finish with a top coat and you are done!!


Monday, September 16, 2013

Oz inspiration for a now gone challenge


I did this mani as part of the weekly challenge category in one of my Google+ communities.  The challenge for the week involved the Wizard of Oz in theme.  I was excited for this as I have a couple of OPI's Oz polishes and love the movies.  AND Rachel Weisz's nails were killer in the movie, and this mani was inspired by that.

From Oz the Great and Powerful
Pretty bad a$$, right??

The colors I used were all OPI: 
- base- My Vampire Is Buff
- Gold glitter on middle finger- When Monkeys Fly
- Bronze glitter- actually a liquid sand color, What Wizardry Is This?

I should't love my own work, but I love this manicure.  It was a tape manicure to achieve the slashes of bronze glitter which also sparkles more with top coat.  The gold glitter....that has some seriously large gold hex glitter in it.  

But I have lost my enthusiasm for this manicure as there is some unknown drama going on within the community, leading to some fantastic and supportive moderators no longer being involved.  Pardon this part of my post as I am climbing up on my soapbox, but it is sad to see when support wanes in a community such as this one and personality takes over.  I like this community, but something seems off here in spite of the "open dialogue" currently taken place regarding these changes.  The changes seem to go against what a community such as this would be about.  So, I am probably going to engage more consistently with other communities and hope to still keep in touch with those who are no longer involved as this was a great sisterhood of support and an inspiration to always improve your skills/art.

With that said, and thank you for listening.  I am bringing the manicam back for its weekly installments, going to continue to be inspired by others and hopefully inspire others, and finish this post with a little dose of cute.  :)


Thursday, September 12, 2013

Zoya Satins and Cashmeres and the manicam.

A little birdie told me fall was coming.  The kids are back to school.  It is Fashion Week.   Pumpkin everything is everywhere.  And there are fall colors for nail polish came out!  Sounds like Fall to me!
Over the past weekend, I picked up a few of Zoya's Satins and Cashmeres collection.

Zoya Satins and Cashmeres

From left to right:  Sailor [Cashmere]; Flynn [Cashemere], and Claudine [Satin].

Zoya Sailor

Zoya Sailor

This is a beautiful, rich navy blue.  As pictured, it is two thin coats without topcoat.   Zoya describes it as a "rich navy creme", and it truly is.  This is quickly becoming my new favorite blue nail polish; which is saying something as I LOVE blue polish.  Sailor is a creme with depth.  This polish goes on smoothly.

Zoya Flynn

Zoya Flynn

I love anything in a carmel or camel color.  This Zoya does not disappoint.  Zoya calls it a "lush camel brown nude creme."  It is.  As pictured, it is two coats without topcoat.  I like it on my skin tone, which can be tricky with some nudes.  The rich, lush color compliments and both blends in and stands out.  

Zoya Claudine

Zoya Claudine

I almost bought this polish on-line during Zoya's back to school sale last month.  I liked it because it looks practically black on-line.  You NEED to see this nail polish in person as it is this beautifully rich metallic smoky gray color polish.  Zoya says, "striking dark meteorite gray metallic."  It is all that and more.  Depending on the light it either picks up more in the gray side of the color wheel, and in other lights it looks more in the black arena.  The smoky color is just beautiful.

I can't say it enough, but these are beautiful fall colors that will transition your summer colors into fall.

It has been awhile....it has been too long...nail polish hasn't really been displayed in its glory due to the lack of red carpet to walk down.....That has changed.  THE MANICAM IS BACK!!!  Not only is it back, but I was playing around with the video feature on Instagram to film the moment.


Zoya Flynn...first attempt.


Zoya Sailor...best one!


Zoya Claudine


Monday, September 2, 2013

Galaxy Nails...Aurora Borealis.

One of the things I love about doing nails is all the folks out there that love to do nails as well.  In addition to following all the lovely blogs out there, I love to share on Instagram and see what others are also doing.  I also like participating in Google+ communities.  One, Nail Polish Lovers, is a great place to share what they are doing and in addition they do a weekly challenge.  I need to start doing more challenges more regularly.  The challenge last week was  Galaxy Nails.  Yay!  I love this technique!  If you remember, I did these for the new release of the Star Trek movie this year....


and


I love this look.  I can't help it.  It may actually be my favorite mani.  For the challenge, I wanted to do something a bit different, but sticking with the technique.  So I decided on a lighter version.


For this I used:
- Sinful Colors: Amethyst [purple] and Soul Mate [pink]
- OPI- Can't Find My Czechbook [light blue]
- China Glaze Turned Up Turquoise [turquoise]
- Julep Adrianna [green]
- China Glaze Fairy Dust [micro glitter]
- Color Club Club Platinum Record [larger hex glitter]

The base coat is Sinful Colors's Amethyst with the other colors sponged on and layered for the nebula effect.  I get in such a groove when I am doing this, that I always forget to take pictures to document each step of the process.  I will make a point to start doing this with more regularity.  I promise!!
This effect was achieved by using a small amount of polish on a make-up sponge and applying the color gradually.  The more polish, the more opaque it will tend to be and the less you will be able to blend the colors.  I actually re-did the ring finger and thumb in order to correct this issue.  I wasn't happy with the color layers.  I like when it looks airy; the color wispy.  
After the color is applied, I use a coat of the Fairy Dust by China Glaze.  This may be my favorite small glitter nail polish out there.  No, I am committing.  This IS my favorite small glitter out there...I then placed the larger hex glitter by hand and finished with a top coat of Seche Vite.


What do you think of it with the lighter color/purple base coat?  Do we like the remix?  Or is classic black background still the way to go?